
Table of Contents

Quick Start
Connect to your WiFi network
Plug in the included USB power supply.
Plug the micro USB cable from the power supply to the 5v Power plug on the back of The Missing Link.

Your Missing Link will boot up and start searching for WiFi. Wait until the display reads ACCESS POINT MODE
Connect your computer or mobile device to the WiFi network named:
MissingLink-XXXX
(replace the XXXX with the last four characters in the serial number found on the bottom of your Missing Link)

Enter the password link1234 when prompted
Point your browser at:
http://MissingLink-XXXX.local/
(Again, replace the XXXX with the last four characters in its serial number)
If the above URL does not work for you, try entering this address:

Click Add WiFi Network from the main menu of the Web Control Panel.

Click your preferred WiFi network, enter the password, and click the Submit button.

Your Missing Link will reboot and connect to your WiFi network.

Note: If you enter the WiFi password incorrectly, The Missing Link will not be able to connect to that WiFi network and will go back in to Access Point Mode once it has rebooted.
Connect The Missing Link to Your Devices
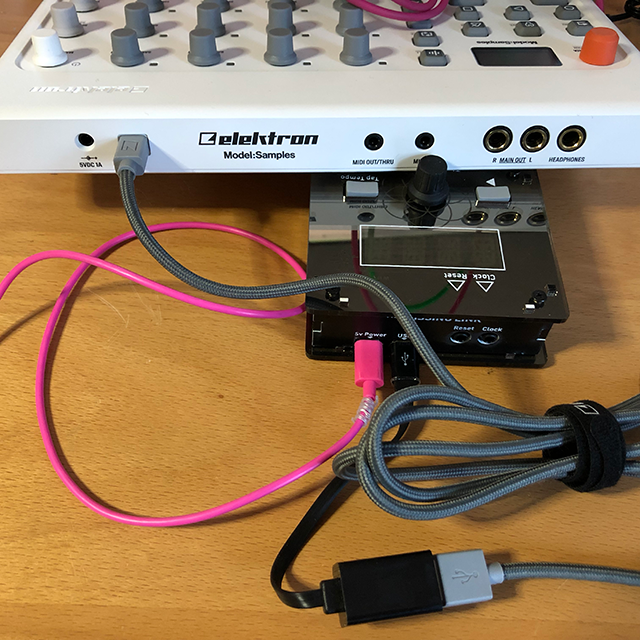
For Syncing Modular Synths or Desktop Machines with Clock Input

Plug a ⅛” patch cable from the Clock output jack of The Missing Link to the Clock/Sync input of your modular device.
Refer to the user manual of your modular device to see what PPQN (Pulses Per Quarter Note) value the clock needs to be set to in order to play at normal speed.
Press The Missing Link’s encoder knob multiple times until you reach the PPQN setting. Rotate the encoder knob to select the correct value.

Plug a ⅛” patch cable from the Reset output of The Missing Link to the Reset input of your modular device. Note: most desktop drum machines do not support this feature. If your desktop box supports MIDI clock, it is recommended to use that instead for sync.
Press play/start button on your modular device to get it ready to receive analog clock.
Press the Play button on The Missing Link to start the clock.
For Syncing with MIDI Devices
The Missing Link supports sending MIDI clock via its micro USB jack. You will need a Micro USB OTG (On The Go) Adapter and a class-compliant USB MIDI interface. Some drum machines and sequencers such as Elektron Digitakt and the Arturia BeatStep have class-compliant MIDI interfaces built in. You can connect The Missing Link to these devices with only a USB cable; no need for an intermediary USB MIDI interface.
Plug a Micro USB OTG adapter in to your Missing Link’s USB port.

Plug a class-compliant USB MIDI interface in to the USB OTG adapter

Plug the MIDI Out of your USB interface in to the MIDI In port of the device you wish to sync
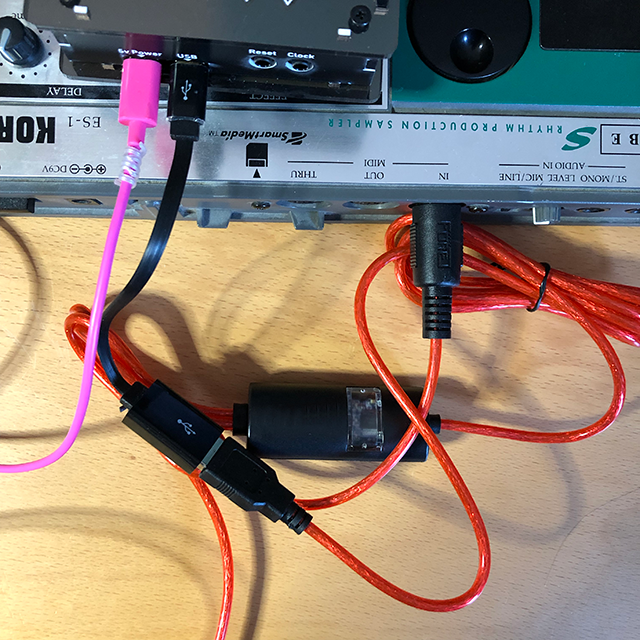
Power up The Missing Link and your drum machine.
Press the Play button on The Missing Link. Your drum machine or sequencer should start playing.
Note: The analog Clock and Reset outputs are still active and usable for syncing analog gear while you are making use of the USB MIDI clock. So you can keep your modular rig and your drum machines all synced up with one Missing Link box!
Correcting an out of sync device
If the drum machine or sequencer falls out of sync with the other Ableton Link peers, do the following:
On The Missing Link, press and hold the encoder knob down.
While the encoder knob is being held down, press the Play button. You can now release both the encoder and the Play button.

At the top of the next loop The Missing Link will send a “Start Transport” message to your MIDI gear. This will tell your MIDI gear to reset its transport to the beginning of its sequence and your MIDI gear will be back in time with everything else.
The Missing Link’s Encoder Menu
There are a number of parameters you can set in The Missing Link’s onboard interface. Pressing down and releasing the encoder knob on The Missing Link will step through the various menu items that change the behavior of The Missing Link. Once you have selected a menu item to edit, turn the encoder knob to select from the available options. Here is an explanation of each of those menu items.
BPM
Available options: 20 – 300
Set the BPM (Beats Per Minute), or tempo, by turning the encoder knob to the left or right. You can also set the BPM by tapping the Tap Tempo button to the right of the encoder knob.
LOOP
Available options: 1 – 9999
This feature sets how often the Reset output triggers. The value in in beats (quarter notes). Setting this value to “4” in a 4/4 signature will give you a 1-bar loop, etc. The Reset output triggers at the start of every loop. This trigger is used to reset a sequencer module so it always plays the beginning of the sequence at the start of each loop. It’s a great safety net in case you accidentally stop/start your sequencer in the middle of a loop. At the start of the next loop, the sequence will reset and all will be back in line.
PPQN (Pulses Per Quarter Note)
Available options: 1, 2, 4, 8, 12, 16, 24, 32
This feature sets how many pulses are used to define a quarter note in the Clock output. Different sequencers have their own requirements for the number of clock pulses. You will have to review the manual for your sequencer to determine what this value should be set to.
RESET MODE
Available options: PULS / DIN1 / DIN2
The Reset output has three options for what it will output:
- PULS: A short trigger at the start of every loop.
- DIN1: Reset output goes “high” while the clock is playing. This emulates the behavior needed to drive a drum machine that supports DIN Sync.
- DIN2: The inverse of PULS. Reset output goes “high” while the clock is playing except for a short dip to “low” at the start of each loop. Use this to have your DIN Sync drum machine reset its transport at the start of each loop.
OFFSET (MS)
Available options: +/- 999 ms
Devices on an Ableton Link peer network can be timeshifted ahead or behind other Link peers. Use the “OFFSET” parameter to correct for this by either delaying or moving The Missing Link ahead in time. This value is in Milliseconds.
SYNC START/STOP
Available options: On / Off
This is an Ableton Link 3.0 feature. When this feature is set to ON The Missing Link will listen for Start/Stop messages from any other Link 3.0 peers with Sync Start/Stop enabled. If any of the devices, including The Missing Link, either start playing or stop playing the other devices will also start or stop playing.
USB MIDI Clock
The Missing Link can talk to any class-compliant USB MIDI interface via its micro USB port. This includes things like the M-Audio Uno or any number of inexpensive USB MIDI interfaces that don’t require special drivers. This also means that any drum machine or sequencer that has a class-compliant USB MIDI port can be plugged directly into The Missing Link.
You will need a Micro USB to USB OTG (On The Go) Adapter in order to adapt The Missing Link’s Micro USB jack to a full size USB A jack. Once you plug in the USB OTG adapter you can then plug in any class-compliant USB MIDI interface to that adapter.
USB MIDI Connection Steps
Plug a Micro USB OTG adapter in to your Missing Link’s USB port.

Plug a class-compliant USB MIDI interface in to the USB OTG adapter

Plug the MIDI Out of your USB interface in to the MIDI In port of the device you wish to sync

Power up The Missing Link and your drum machine.
Press the Play button on The Missing Link. Your drum machine or sequencer should start playing as well.
Note: The analog Clock and Reset outputs are still active and usable for syncing analog gear while you are making use of the USB MIDI clock. So you can keep your modular rig and your drum machines all synced up with one Missing Link box!
How To Stay Aligned With Non-synced Instruments
If you find yourself playing with musicians that are not synced to a grid or clock, you might find yourself needing to redefine the “grid” from time to time. For example, the band stopped playing one song and started playing a new song at an arbitrary time. Now your Link grid is out of alignment with the band. You can re-zero the Link timeline with a special command on The Missing Link:
Hold down the encoder button, and while you continue to hold that button down, press the Tap Tempo button. Now you can release both buttons. The timeline will re-zero to the moment you pressed the Tap Tempo button. Your grid has been re-aligned with the live instrumentation.
The Web Control Panel
Connecting to the Control Panel

The Missing Link hosts a web application for administering WiFi settings and installing software updates. You can access this web control panel when The Missing Link is in either Access Point Mode or is connected to your local WiFi network.
If The Missing Link is in Access Point Mode, then connect your computer or mobile device to The Missing Link’s WiFi access point. It will have the same name as the serial number printed on the bottom of your Missing Link case.
If your Missing Link is connected to your local WiFi network then connect your computer or mobile device to the same local WiFi network.
Now that your computer or mobile device is on the same network as your Missing Link you can access the control panel by opening a web browser and entering the following URL based on your Missing Link serial number:
http://missinglink-xxxx.local/
Replace the “xxxx” with the unique four character code in your Missing Link serial number. Also note that there’s a trailing “/” at the end of the URL. Your browser needs this forward slash in order to correctly parse the URL.
The browser should now be displaying the main menu of the Web Control Panel. Here you can add or remove stored WiFi networks or update the software installed on The Missing Link.
Connecting to The Missing Link via an IP address
If your Windows computer or mobile device does not support Multicast DNS (aka Apple Bonjour) you will not be able to access The Missing Link via its “.local” web address. Apple has a Windows installer for mDNS/Bonjour support. If you cannot install mDNS services then you will have to access your Missing Link via its IP Address.
Missing Link IP address when in Access Point Mode
The IP address to access your Missing Link Web Control Panel is:
Missing Link IP address when connected to your own WiFi network
The IP address is not known when it is connected to your own WiFi network since the address will by dynamically assigned by your WiFi router. If you need to connect via IP address then you should configure your WiFi router to give your Missing Link a dedicated IP address. You can do this with most routers via the router’s administration app or web page.
Add WiFi Network

Click the Add WiFi Network button. You will be presented with a list of available WiFi access points that The Missing Link could connect to. Click on one of the names in the list. Enter the password for that WiFi network and press the Submit button. Your Missing Link will store the WiFi network information and automatically reboot. Once it boots back up it will try to connect to that WiFi network with the password you entered. If the password is correct, your Missing Link will connect to the network successfully and the WiFi light will glow solid blue. If you entered an incorrect password, The Missing Link will go back in to Access Point Mode after it determines that there’s no valid networks to connect to.
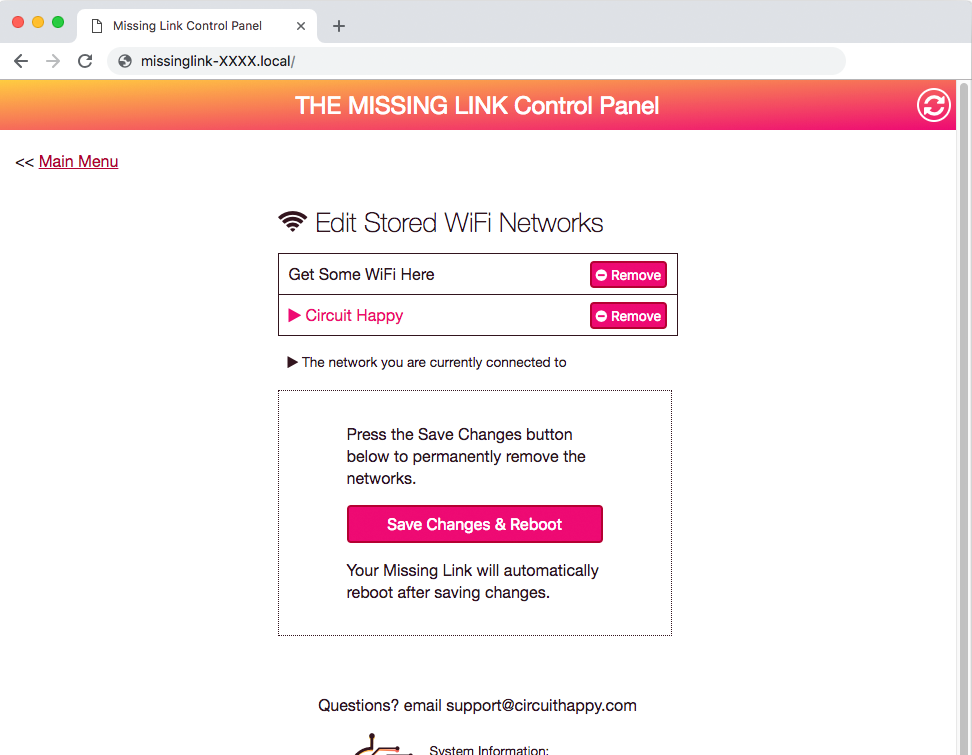
Remove Stored Network
Click the Remove Stored Networks button. You will be presented with a list of the stored WiFi networks that you’ve entered via the Add WiFi Network button.

Click the remove button to the right of the network name to queue up removing that network. It will disappear from the list, but it is not yet removed.
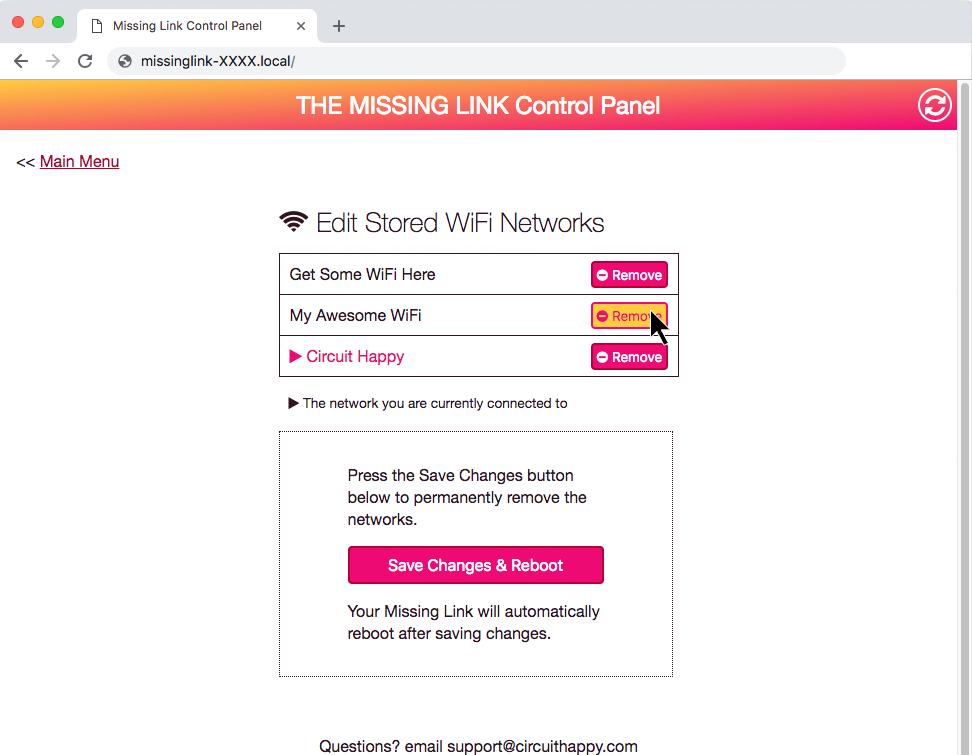
The commit the changes click the Save Changes button at the bottom of the list. Your Missing Link will automatically reboot the commit the changes.
Software Updates

Click the Update Software button. You need to be connected to a WiFi network that has a valid Internet connection to use this page.
When you click the “Check For And Install Updates” button The Missing Link will check the Circuit Happy software update repository for a newer version of the installed software.
A small spinning icon will appear next to the button to show you it is working on downloading and installing the update.
After the install successfully finishes, The Missing Link will automatically reboot.
Beta Codes
Unless you are participating in a beta testing program, please leave this field blank.
Troubleshooting
I can’t connect to the Web Control Panel
Make sure that your computer is connected to the exact same WiFi network. If your computer is connected to the WiFi network with “My Network 5G” at the end but The Missing Link is connected to “My Network” (without “5G” at the end), they may not be able to see each other correctly.
Be sure there’s a trailing slash in the URL:
http://missinglink-xxxx.local/
If that doesn’t work try dropping the .local from the URL:
http://missinglink-xxxx/
When in Access Point Mode you can use this IP address to access your Missing Link:
http://192.168.4.1
When your Missing Link is connected to your own WiFi network, then the IP address is dynamically assigned. You should be able to find the IP address of your Missing Link via the administration panel of your WiFi router.